One key to creating a positive learning experience is providing learners with information that meets their needs. While this often involves assigning training in the form of courses, it can also include sharing content in a resource library.
As an LMS administrator, part of your role is to ensure that every learner has access to relevant information. For example, Marketing department members need access to target audience research, design files, and brand style guides. In contrast, members of the Client Support department need access to troubleshooting manuals, integration guides, and FAQ documents.
Further, you may want to restrict access to certain content — such as budget reports, answer keys, and HR records — to specific people. Properly configured permissions ensure the right people can access the right resources, resulting in enhanced productivity, efficiency, and security.
Want SmarterNews delivered to your inbox? Subscribe today!
Manage Knowledge Base Access in SmarterU LMS
SmarterU LMS’s knowledge base feature makes it easy to upload, share, and manage access to your resources.
Using folders, you can organize your resources into a hierarchical structure, such as by topic, product, department, or type.
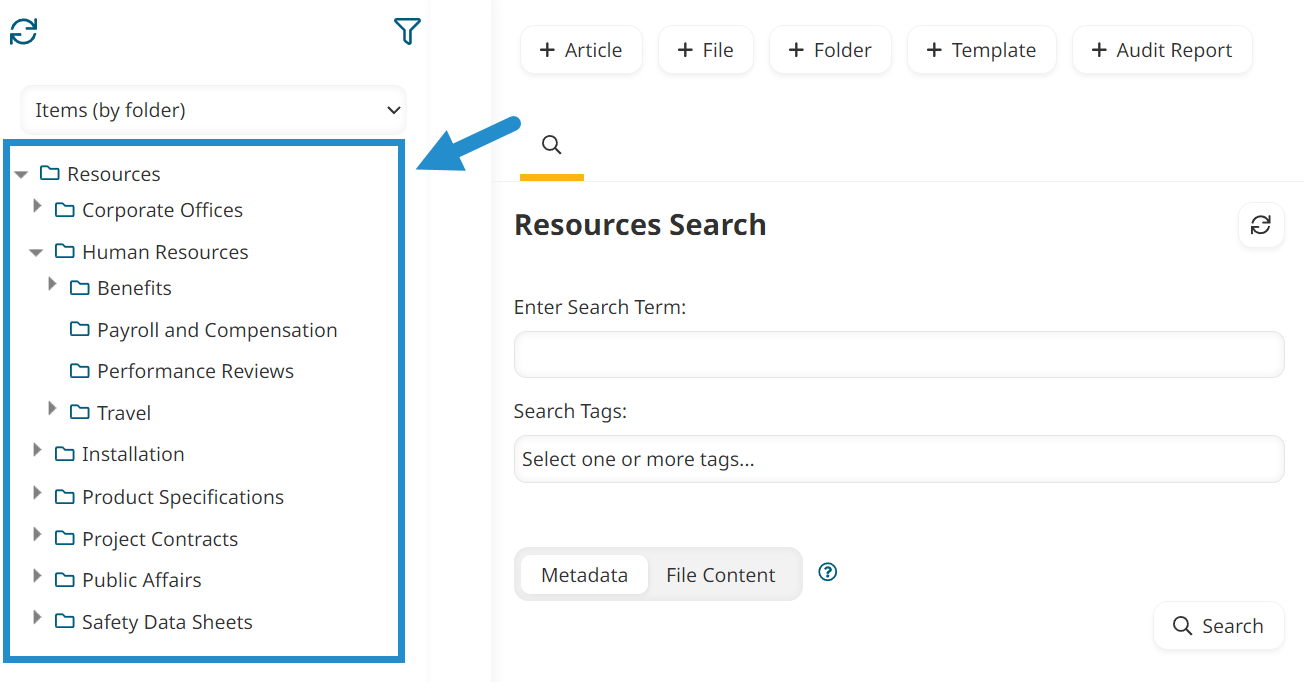
You can then use permissions to manage access to your knowledge base, folders, or individual resources.
For example, you can set up the Safety Data Sheets folder so everyone in the Warehouse group has view access and Robin Atkins, the Warehouse Manager, has edit access.
You can also use permissions to restrict access. For example, you can set up a folder so that everyone except members of the Vendors group has access.
By default, the permissions you set for an object will be inherited by everything below it in the hierarchy.
For example, if you give the Sales group access to your knowledge base, they will also have access to all folders and resources within it.
As another example, if you give the Retail group access to the Products folder, they will have access to all its resources.
Using permissions, you can override these defaults for any folder or resource.
Configuring Your Knowledge Base Permissions
The process for managing permissions is very similar, regardless of whether you are editing your knowledge base, a folder, or a resource (article or file). You can set permissions based on group, team membership, learning plan assignment, subscription assignment, or even by individual users.
With such granular customization, you can ensure that learners have access to relevant information, maintain security, and enhance productivity.
Knowledge Base Permission Examples
Let’s look at a few common examples of permission setups.
Example 1: Grant Access to Individual Users
Anna is the LMS administrator at a fictional company, Clear Day Windows. She has just added a new article to the knowledge base called Innovative Glazing Techniques.
She wants Claudio and Maya to review and edit the article before sharing it with learners.
To accomplish this, Anna:
Edits the Innovative Glazing Techniques article.
Views the Permissions accordion.
Clicks the checkbox to override the permissions for the parent folder.
Sets the default view and edit permissions. In this case, she sets Default View Permission and Default Edit Permission to None.
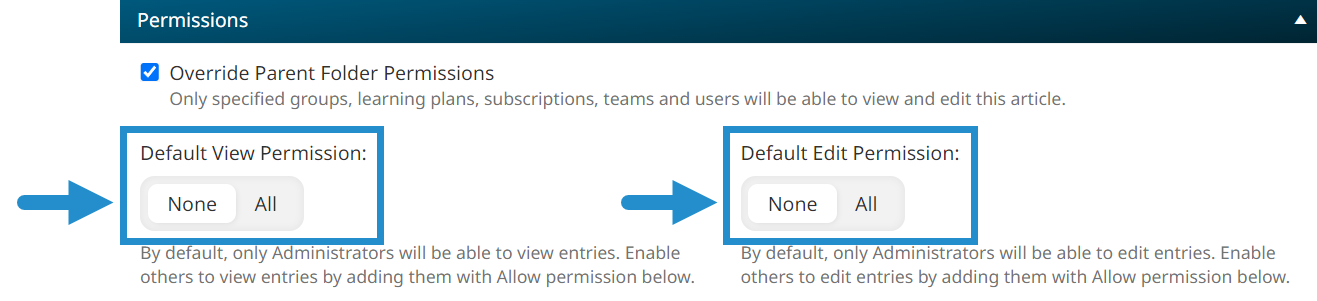
If you set the default to None, nobody can view or edit your folder and its contents. You can then use permissions to grant access to specific groups, teams, learning plans, subscriptions, and users.
If you set the default to All, everyone can view or edit your folder and its contents. You can then use permissions to restrict access to specific groups, teams, learning plans, subscriptions, and users.
Clicks +Permission Entry.
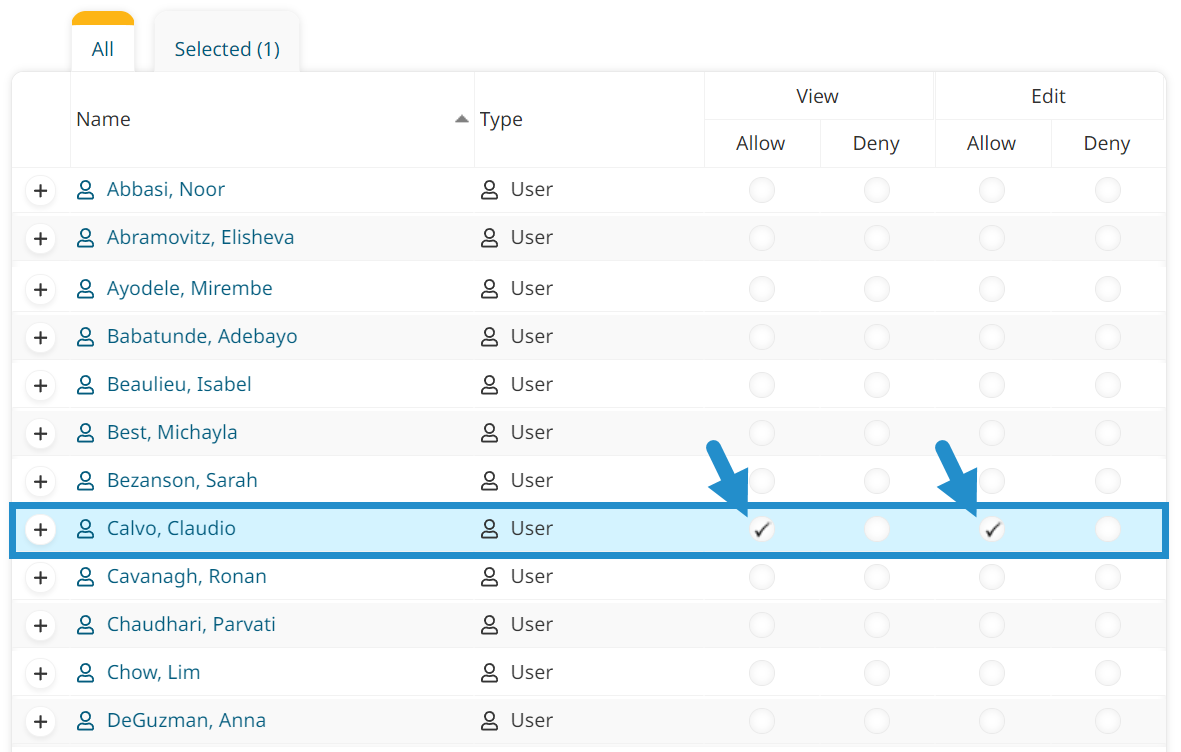
Views the Users tab.

Finds Claudio and sets View to Allow and Edit to Allow.
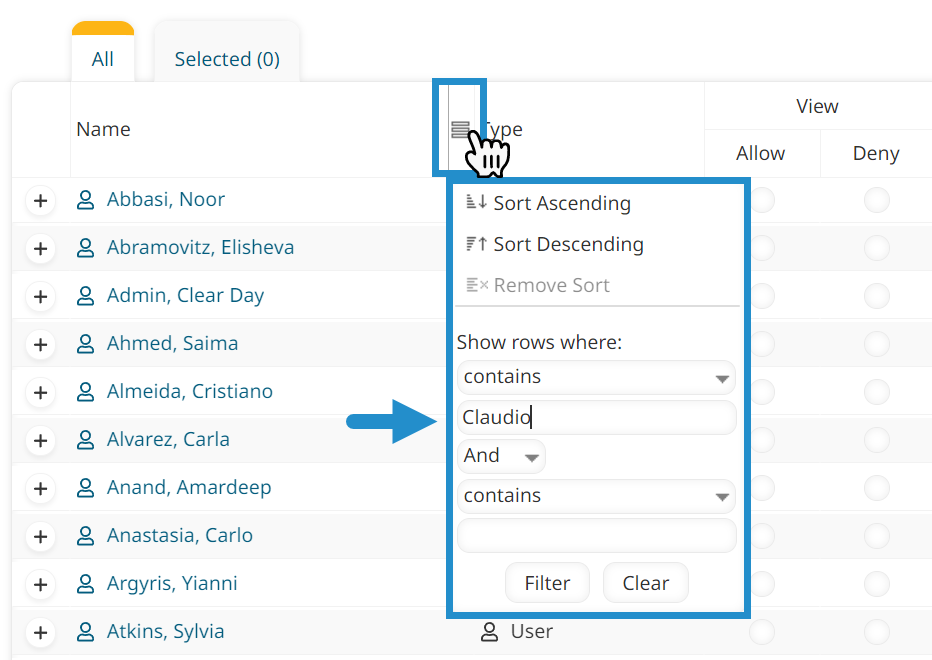
Use the grid’s search and filter functionality to find what you need quickly.
By default, when you give someone permission to edit something, they will automatically be permitted to view it.
Finds Maya and sets View to Allow and Edit to Allow.
Clicks Save.
Limiting access to specific users is also common when managing resources that contain private information, such as client contact sheets, financial reports, and confidential documents. With granular permissions in SmarterU LMS, you can ensure that only authorized users can access restricted resources, maintaining data integrity and privacy requirements.
Example 2: Grant Access to a Specific Team
Next, Anna creates a folder in the Clear Day Windows resource library called Health & Safety. It contains various resources, including safety training videos, risk assessment checklists, and incident reporting forms.
Anna is ready to share the folder with the Clear Day Safety team.
To do this, she:
Edits the Health & Safety folder.
Views the Permissions accordion.
Clicks the checkbox to override the permissions for the parent folder.
By sharing a folder, you can grant access to everything within it in one step. You can then override permissions for individual resources if there are certain items you want to limit access to.
Sets the default view and edit permissions. In this case, she sets Default View Permission and Default Edit Permission to None.
Clicks +Permission Entry.
Views the Teams tab.

Finds the Clear Day Safety team and sets View to Allow and Edit to Deny.
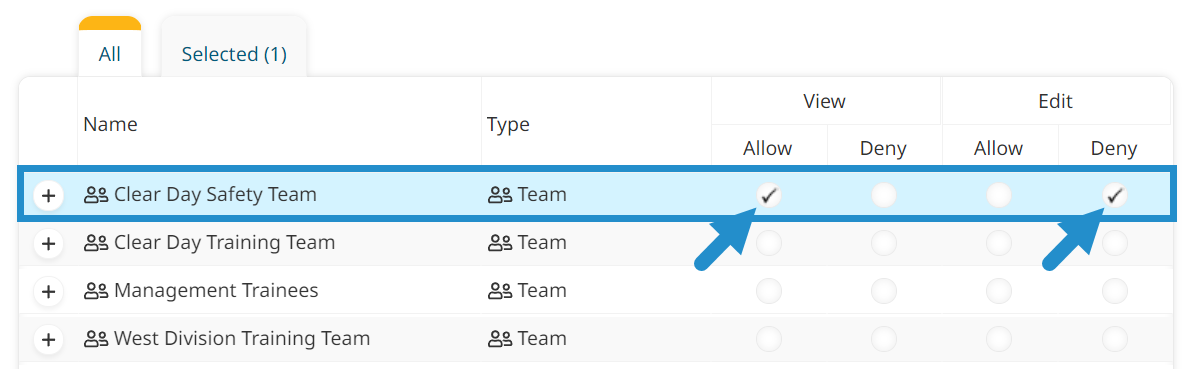
Clicks Save.
Everyone belonging to the Clear Day Safety team (currently and in the future) can see all of the resources in the Health & Safety folder. They will also immediately see any changes to the folder when Anna adds, removes, or edits resources.
Another common scenario is to create team-specific folders. For example, you may create a Sales folder to share with sales team members, a Warehouse Employees folder to share with warehouse workers, a Managers folder to share with leadership, and so on. This setup makes it easy to manage and share team-specific resources with those who need that information to do their job effectively.
Example 3: Grant Access to Users Assigned a Learning Plan
Before operating a forklift in the Clear Day Windows warehouse, all employees must complete compliance training on safe driving practices, load handling, and hazard identification. Anna delivers this compliance training through a learning plan called Forklift Training.
To supplement the training, she adds several resources to the Forklift Drivers folder in the knowledge base, including several maintenance manuals, pre-operation checklists, and industry standards.
Anna wants to share these resources with everyone assigned the Forklift Training learning plan.
To achieve this, she:
Edits the Forklift Drivers folder.
Views the Permissions accordion.
Clicks the checkbox to override the permissions for the parent folder.
Sets the default view and edit permissions. In this case, she sets Default View Permission and Default Edit Permission to None.
Clicks +Permission Entry.
Views the Learning Plans tab.

Finds the Forklift Training learning plan and sets View to Allow and Edit to Deny.
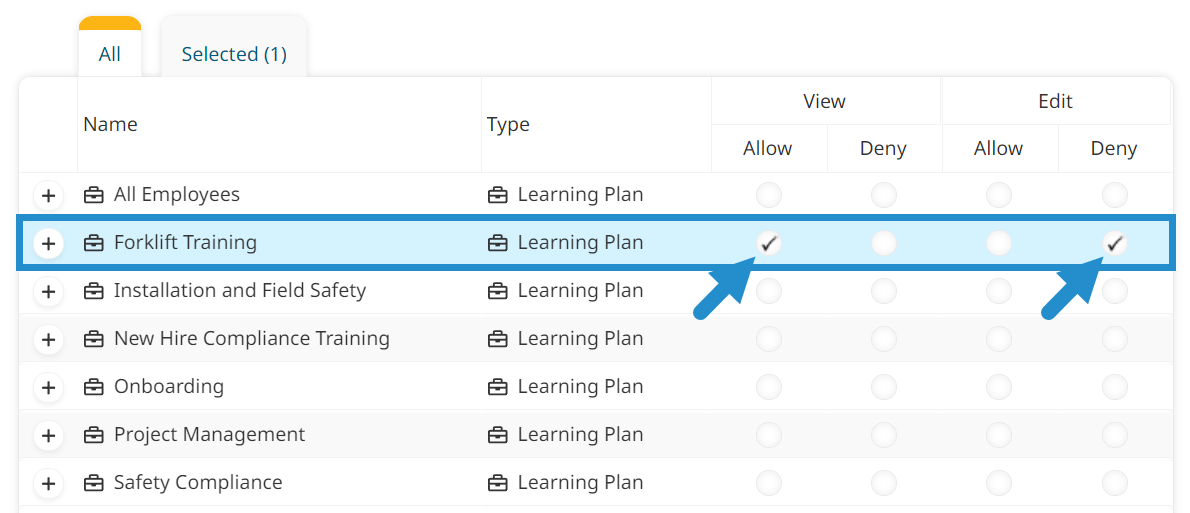
Clicks Save.
Whenever a learner is assigned the Forklift Training learning plan, they will automatically have access to the Forklift Drivers folder and all of its resources.
You can seamlessly integrate required learning with supplemental resources by sharing resources with learners based on learning plan assignments. Quick access to resources makes it easy for these learners to review relevant information upon completing the learning plan, access printable forms, and review the latest regulation updates outside annual training recertification.
Advanced Permission Management
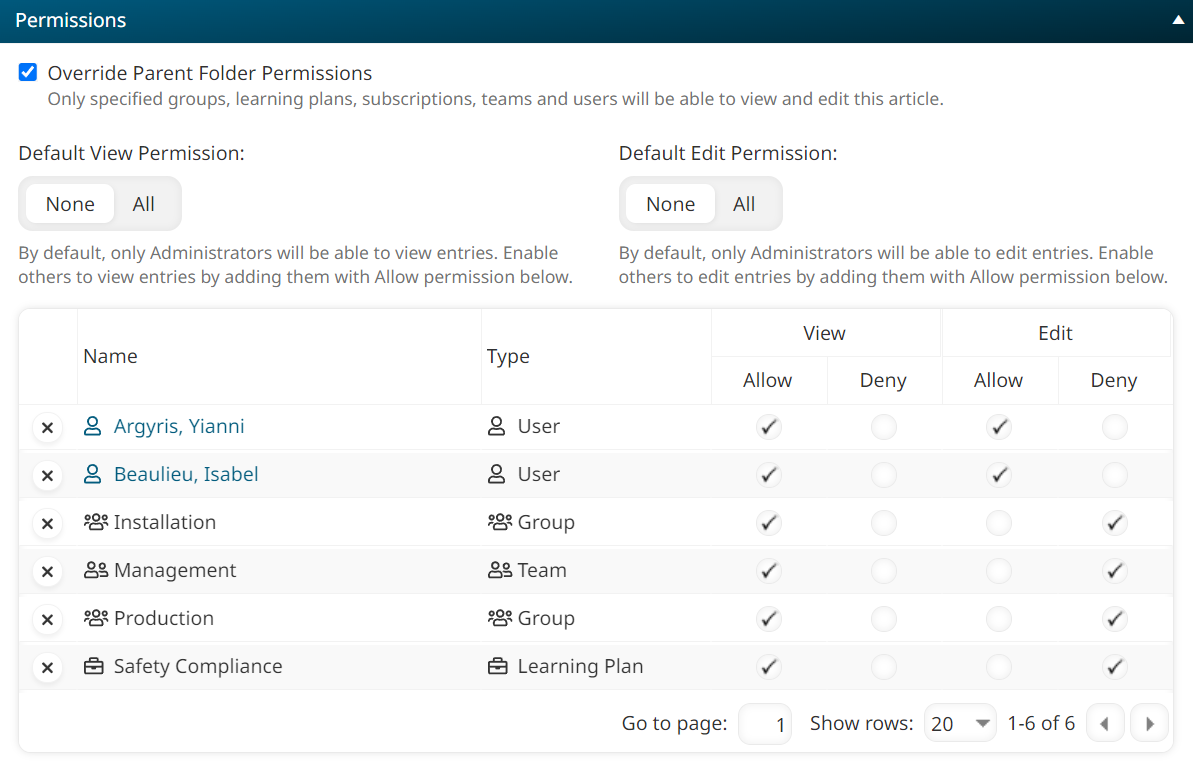
With SmarterU LMS, you can also configure complex permission setups to control resource access on a very granular level.
For example, you may limit view access to a resource to learners belonging to the Installation or Production group, the Management team, and those enrolled in the Safety Compliance learning plan. You may then grant edit access to specific users: Yianni and Isabel.
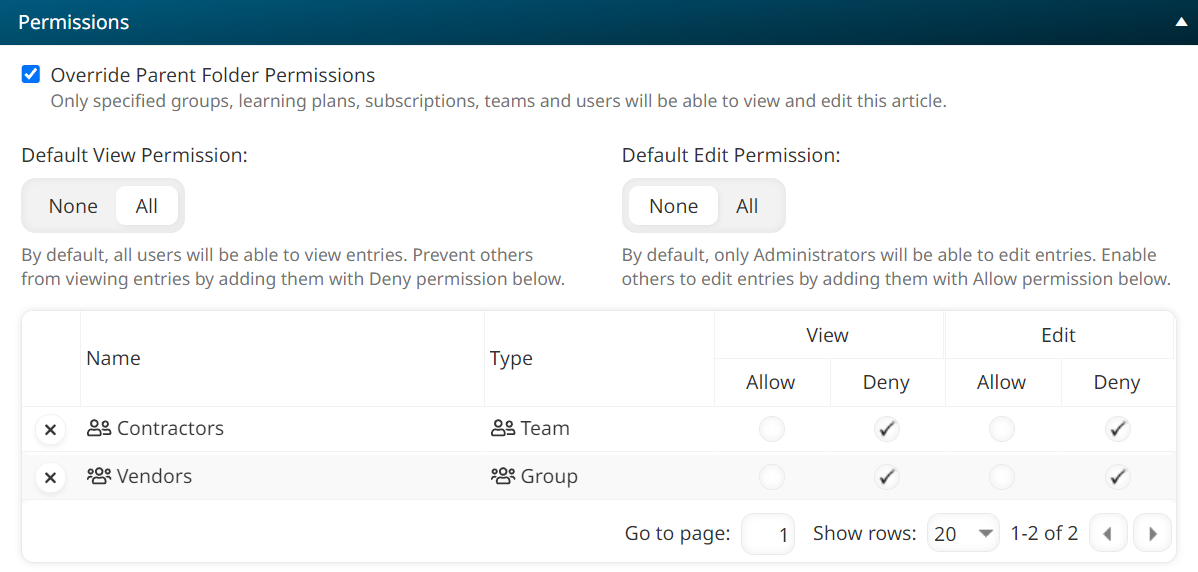
As another example, you may give everyone in your organization access to a folder and its contents, except members of the Vendors group or Contractors team.
With SmarterU’s granular knowledge base permissions, you can ensure the right people get access to the right information. Share resources with entire groups or teams, or use a combination of permissions to specify who should have access to your information even more precisely. Using knowledge base permissions to maintain data security, share relevant content, and meet your organization’s diverse needs is easy in SmarterU.
Do you have questions about this or any other feature? Contact our Success Desk.